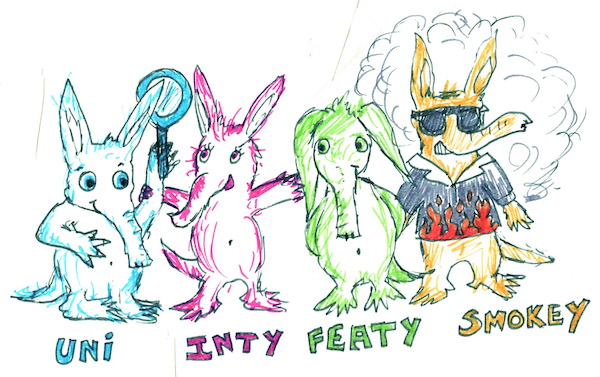
Four Probe Testing
Table of contents
- Background
- Assumptions
- Scope
- A note on context and naming
- Our Unit Tests
- Our Integration Tests
- Our Feature Tests
- Our Smoke Tests
- Conclusion
Background
Testing can be a controversial topic. I should warn you therefore, that you won’t get much fire and brimstone out of me. You will get aardvarks out of me.
Driven by what we’ve found to be practical, we make use of four standard testing techniques, in combination (hence “four probe”). You can think of these techniques as four aardvark-noses, probing the depths of your application, in search of ants. I’ll demonstrate our approach, using this abominable metaphor.
There’s an example repository that accompanies this post, and we’ll refer to it below, as required. We’ve used Ruby, however the general approach is transferable to other contexts.
Assumptions
This post assumes that you’re a little bit familiar with:
- Ruby or another programming language
Scope
We’ll be covering:
-
Nothing new; these techniques have been around for a while
-
Testing with an emphasis on object-oriented languages, rather than functional languages (I’m not sure how many of the techniques here are useful in the functional world, some may be)
-
Unit Testing in loose, practical terms
-
Integration Testing (our own interpretation of what this means)
-
Feature Testing in loose, practical terms
-
Smoke Testing in loose, practical terms
-
What drives us to write a particular type of test, for the code we have in mind
-
A focus on some of the tools available to us in the Ruby world
-
An emphasis on RSpec and Capybara for lightweight Feature Testing, rather than Cucumber (although Cucumber’s fine too)
A note on context and naming
It’s worth pointing out that in this demonstration, we’re working outside of Rails. As such, we’ve not inherited the traditional Rails directory structures, and corresponding test directories (for example, app/controllers and correspondingly, spec/controllers). Instead we introduce our own test directory structure.
I should also point out that our breakdown into four kinds of test, and the corresponding directory structure we’ve chosen, is driven largely by technical rather than business process concerns; we want to keep the configuration for the test-types separate, because each type has different set-up requirements. Our Unit, Integration, Feature and Smoke tests all operate using different configuration, and they allow us to test our application from different ‘entry points’ technically-speaking.
In terms of mapping testing to business processes we may employ more than one kind of test to meet a business need. For example, with regards to Acceptance Testing we may use more than one kind of test to express acceptance. In this model, we regard Acceptance Testing as more of a business process deliniation, than a technical dictate. In fact, we tend to tag our Acceptance Tests with the number of the ticket we’re working on, and these tests may span both our Integration and Feature test folders, in terms of where they live and how they’re configured. So there is no particular directory or configuration specifically for Acceptance Tests.
The names we’ve given each of our four kinds of test are not arbitrary (we tried to pick names based on a common understanding). However, it’s fair to say that these names aren’t that important and could be switched out for something that makes more sense to you. This is an important point, because if you’re familiar with a different naming convention for the tests you write, you might get confused by the names we’ve chosen! That’s not our intention, but it’s possible!
So bear with us. No, wait, aardvark with us …
Our Unit Tests
Unit Testing makes me think of some kind of telescopic-nosed aardvark. He is “zoomed-in”, focused on a single chamber, deep in the ant nest (our application).
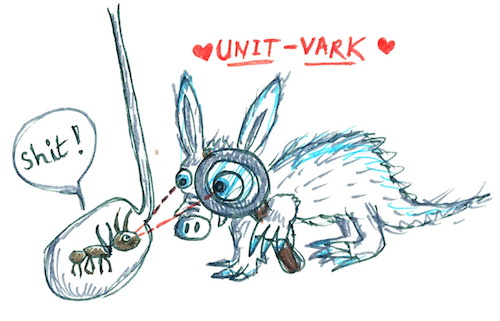
-
WE’RE DRIVEN TO WRITE THESE TESTS WHEN: We want to “zoom in” and test the behaviour of a single “unit” of code, independently (for example, a method/function).
-
PRACTICALLY-SPEAKING: When I’m at the outset of a project, and the application is going to be a web service of some kind, I tend to find myself writing a Feature Test before writing any Unit Tests. I’ve understood the general purpose of the feature I’m supposed to provide, so I begin testing in this “zoomed-out” state with a Feature Test. Then, when I’ve engineered the application to provide a mock response at the Feature-test-level, I “zoom in” and begin to ensure that the individual units of the application behave as we need them to. For this, I write Unit Tests.
-
MARGIN FOR DISCUSSION: What I’ve described above is of course a gross generalisation, and I’m sure I flout my own account all the time. There are all sorts of discussions we could have about Unit Testing, including whether to bother testing every single “unit”, and whether/how to test private methods.
-
THEY LIVE AT:
/spec/unit. -
THEY’RE DRIVEN FROM: The parent context of the unit-under-test (for example, the class/module that houses the method-under-test).
-
THEY PASS THROUGH: A single component of the app (for example, the class/module that houses the method-under-test).
-
THEY MOCK: All dependencies (i.e. any resource that the method-under-test depends on).
-
A SILLY EXAMPLE: Taken from the repository that accompanies this post:
describe AntNest do
  describe '#get' do
    let(:faraday_response) { double('Faraday::Response', body: ant_data) }
    let(:ant_data)         { 'Mock ant data' }

    before do
      allow(Faraday).to receive(:get).and_return(faraday_response)
    end

    it 'returns some ant data' do
      expect(subject.get).to eq('Mock ant data')
    end
  end
end- The example is written in RSpec.
- We drive things from the parent context of the method-under-test, in this case
AntNest(note that when we executesubject.getwe’re actually executingAntNest.new.getbehind the scenes). - We’re executing a single class of our application,
AntNest, and calling a single public method, within that class,.get(incidentally,.getitself calls a private method). - We’ve mocked all our dependencies, in this case Faraday.
Our Integration Tests
Integration Testing makes me think of an aardvark who’s watching two-or-more chambers within the ant nest, to observe interaction between them. She wants to understand the relationship between these chambers. She wants to be sure that the expected ants travel between them without trouble.
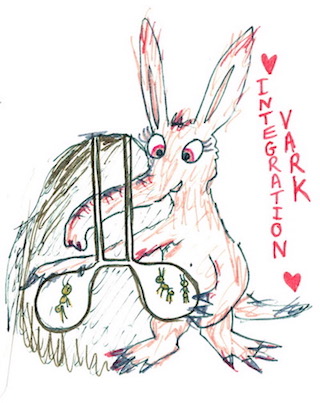
-
WE’RE DRIVEN TO WRITE THESE TESTS WHEN: It’s particularly important that a couple of interfacing components play nicely together.
-
PRACTICALLY-SPEAKING: This is our own interpretation of what “Integration Testing” means. Some people use the term interchangeably with Feature Testing, but for us, the key difference is that an Integration Test does not need to test a complete feature of the application, from the user’s perspective. For us, it’s more like a “wider-than-unit-only” test, specifically designed to give us assurance that two parts operate well together. We’ve found this technique particularly useful when we want to be sure of our application’s behaviour in response to the presence of certain middleware in the stack, but we’re not particularly driven to “zoom out” and test at the full Feature-level. But we’ve also used it to check on the relationship between a couple of regular classes.
-
MARGIN FOR DISCUSSION: I hope you’re not offended that we’ve decided to appropriate the term Integration in this rather flexible way. You may choose to dispense with this “somewhere-between-unit-and-feature” test category, and that’s completely fine. Just to let you know we’ve found it useful.
-
THEY LIVE AT:
/spec/integration -
THEY’RE DRIVEN FROM: The context of the components-under-test.
-
PASS-THROUGH: Multiple components of the application, but not the whole app.
-
MOCK: All dependencies that the components-under-test require.
-
A SILLY EXAMPLE: Taken from the repository that accompanies this post:
require 'spec_helper'

describe "AntNestEntrypoint's behaviour given Topsoil", type: :integration do
  include Rack::Test::Methods

  let(:app) do
    Rack::Builder.new do
      use Topsoil
      run AntNestEntrypoint
    end
  end

  let(:ant_nest) { double('AntNest', get: 'Mock ant data') }
  let(:env)      { {} }
  let(:params)   { {} }

  before(:each) do
    allow(AntNest).to receive(:new).and_return(ant_nest)

    get '/', params, env
  end

  context 'when Topsoil is fine' do
    specify 'AntNestEntrypoint DOES call the AntNest' do
      expect(ant_nest).to have_received(:get)
    end
  end

  context 'when Topsoil is too dry' do
    let(:env) { { 'HTTP_USER_AGENT' => 'Parched browser (super-dry 3000)' } }

    specify 'AntNestEntrypoint does NOT call the AntNest' do
      expect(ant_nest).not_to have_received(:get)
    end
  end
end- The example is written in RSpec.
- It’s testing the behaviour of a class within the app, given the presence of some middleware called
Topsoil. - We make use of Rack to set up our conditions for including the middleware in the test stack, and Rack::Test to interrogate the resultant test stack.
- We’ve mocked all dependencies (the
AntNestclass) beyond the two components-under-test. - Note that
type: :integrationis just an RSpec tag, which enables us to run Integration Tests separately should we want to, via$ bundle exec rspec --tag type:integration.
Our Feature Tests
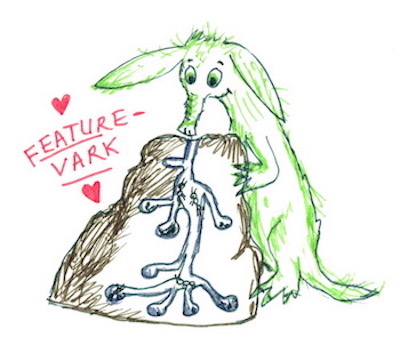
Feature Testing makes me think of an aardvark observing a given route through the whole ant nest. Sitting just outside the nest, he’s determined to use his snout to investigate the full extent of that route. He wants to see all parts of the route working together, to provide him with ants for breakfast.
What Feature-vark (thankfully) doesn’t know, is that he’s actually in a zoo, and the ants have been placed in the nest somewhat artificially, for his benefit. This last part of the metaphor is meant to indicate that we are still mocking our external dependencies. This is the key distinction between our Feature and Smoke tests, since as we’ll see below, our Smoke tests mock no dependencies, not even external services that the app might depend on.
-
WE’RE DRIVEN TO WRITE THESE TESTS WHEN: We want to test the behaviour of a useable feature of the application.
-
PRACTICALLY-SPEAKING: As I mentioned above under Our Unit Tests, I find myself writing Feature Tests first thing, when I’m introducing a new feature. I tend to get the feature working in broad terms, perhaps with some mock-ish response coming from the app, and then I break off to focus on the detail of the components that produce the response I’m after. Therefore, I may not complete the nitty-gritty of the Feature Test until I’ve “zoomed-in” and written a few Unit Tests and corresponding code.
-
MARGIN FOR DISCUSSION: The example used below isn’t particularly strict about expressing things in a BDD-fashion, with
given,when,then. Although there is a way to do this using the rspec-example_steps gem. -
THEY LIVE AT:
/spec/feature -
THEY’RE DRIVEN FROM: The browser context (we’re assuming for now, that this app is used via a browser).
-
PASS-THROUGH: All layers of the application.
-
MOCK: All external dependencies (i.e. any external services that the feature-under-test depends upon). However no components within the app are mocked.
-
A SILLY EXAMPLE: Taken from the repository that accompanies this post:
require 'spec_helper'

feature 'Visiting the index page' do
  background(:each) do
    VCR.use_cassette(:wikipedia_response) do
      visit '/'
    end
  end

  scenario 'the page loads successfully' do
    expect(page.status_code).to eq(200)
  end

  scenario 'the main page header is displayed' do
    expect(page.body).to have_css('h1#main', text: 'Hi, little Aardvark!')
  end

  scenario 'ant-related data is displayed' do
    expect(page.body).to include('"title":"Ant"')
  end
end- The example is written in RSpec.
- The configuration for this test is available in
/spec/spec_helper.rb. - It’s testing the behaviour of a feature of the app, which is supposed to provide ant-like-data to the aardvark user.
- Capybara allows us to run up the app in the test process, and provides the DSL for interrogating it.
- Poltergeist and PhantomJS provide the driver and headless browser for vising the web service.
- VCR is used to record the responses that we get from our external dependencies, in this case, Wikipedia’s API, so that the recording can be used going forwards, as a mocked dependency.
- Note that in this example, because the feature we’re providing is so “sterile” and “read-only”, we’re not making full use of Capybara’s capabilities when it comes to interacting with the page, for example, filling in fields and clicking around, but this is all possible.
- Note that RSpec’s
feature/scenariokeywords are correspondant with itsdescribeanditorspecifykeywords. It’s by virtue of this syntax that behind the scenes, the Feature Test is marked up withtype: :feature, despite us not having done so explicitly here. It’s also by virtue of this test metadata, that our Capybara configuration is invoked. - Capybara can in fact be invoked in three ways; by using the
featurekeyword instead ofdescribe, by tagging the test withtype: :feature, or if you’re using therspec-railsgem, by placing the test in a “spec/features” folder, and setting:RSpec.configure { |config| config.infer_spec_type_from_file_location! }. - Using the keyword
featureas we’ve done also enables us to run Feature Tests separately should we want to, via$ bundle exec rspec --tag type:feature.
Our Smoke Tests
Phew! That last section was long, and I don’t want to exhaust you. Luckily, since we’re discussing Smoke Tests now, and since these have alot in common with our Feature Tests, I can try to keep this section short.
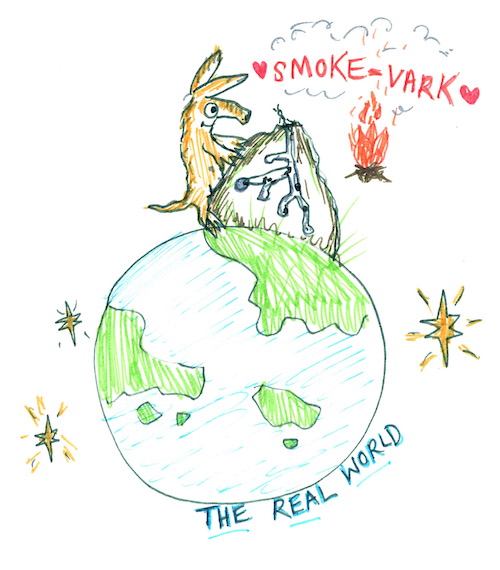
Just like Feature Testing, Smoke Testing makes me think of an aardvark observing a given route through the whole ant nest. Only this time, she’s very much “in-the-wild”, “out-there”, “in the real world”. This part of the metaphor is used to indicate that we’re testing a feature of our app … IN A PRODUCTION ENVIRONMENT! No dependencies, not even external services, are mocked. This is the real deal, and this aardvark has access to wild ants.
-
WE’RE DRIVEN TO WRITE THESE TESTS WHEN: We want to test the behaviour of a useable feature of the application, in a production environment.
-
PRACTICALLY-SPEAKING: It can be particularly useful to run Smoke Tests during a blue-green-deploy of your application, to ensure that the newly-deployed application behaves as expected, prior to routing all traffic to it. In case you’re interested, here’s how we do this during our Travis-CI-to-Cloud-Foundry deploys.
-
MARGIN FOR DISCUSSION: We tend to Smoke Test only “happy paths”, to keep these tests as lightweight as possible.
-
THEY LIVE AT:
/spec_smoke. This is to help RSpec distinguish between Smoke Test Capybara configuration and the Feature Test Capybara configuration we have in place. You could otherwise have them sit atspec/smoke. -
THEY’RE DRIVEN FROM: The browser context (we’re assuming for now, that this app is used via a browser).
-
PASS-THROUGH: All layers of the application.
-
MOCK: No dependecies, this is the real deal, and we call external services as part of the test.
-
A SILLY EXAMPLE: Taken from the repository that accompanies this post:
rrequire_relative 'spec_helper'

feature 'Visiting the index page in production' do
  background(:each) do
    visit '/'
  end

  scenario 'the page loads successfully' do
    expect(page.status_code).to eq(200)
  end

  scenario 'the main page header is displayed' do
    expect(page.body).to have_css('h1#main', text: 'Hi, little Aardvark!')
  end

  scenario 'ant-related data is displayed' do
    expect(page.body).to include('"title":"Ant"')
  end
end- This test is largely based on the example shown in Our Feature Tests.
- The key differences are:
- the configuration allows us to specify a production host to run the test against. So you can run Smoke Tests with:
$ SMOKE_TEST_HOST=<production host> bundle exec rspec spec_smoke. - no dependencies are mocked, not even external services, hence the lack of VCR configuration.
- the configuration allows us to specify a production host to run the test against. So you can run Smoke Tests with:
Conclusion
We’ve looked at four standard testing techniques; Unit Testing, Integration Testing (our own interpretation), Feature Testing and Smoke Testing.
We’ve seen some of the factors that drive us to write each of these kinds of test, and we’ve had a look at how we might configure them to run.
In our (albeit quite small) team, we’ve found that having these four lightweight test suites up and running, affords flexibility when it comes to writing and maintaining our code. We find that we can pick-and-choose at what level to start testing, depending on the problem we’re trying to solve, and that the testing solution “feels right” rather than forced, or over-the-top.
Hip hip hooray!
Long live The Four Fearsome Aardvarks of Testing!
Long live The Four Fearsome Aardvarks of Testing!
Long live The Four Fearsome Aardvarks of Testing!
Long live The Four Fearsome Aardvarks of Testing!!!!
Disclaimer: No ants were harmed in the making of this post.
Find this post useful, or want to discuss some of the topics?